cos多少度等于0.675(cos多少度等于0.6753)
前言作者:android超级兵
环境
system : macOSandroid studio : 4.1.3constraintLayout : 2.0.4gradle : gradle-6.7.1-binkotlin : 1.4.23你需要知道什么
MotionLayout是ConstraintLayout的子类,具有ConstraintLayout所有功能。
implementation 'androidx.constraintlayout:constraintlayout:2.0.4'
使用as预览MotionLayout,as版本必须 >= 4.0。
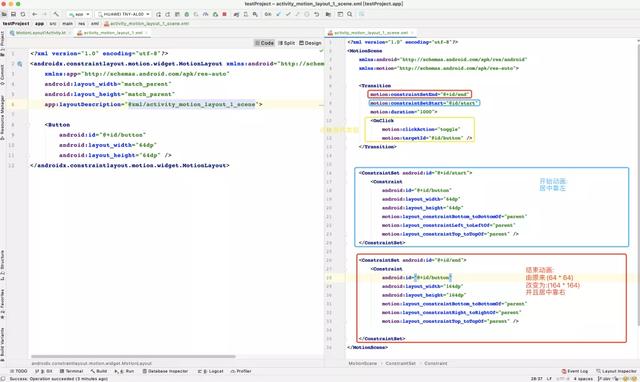
使用 MotionLayout 创建动画将原ConstraintLayout转换为MotionLayout布局。
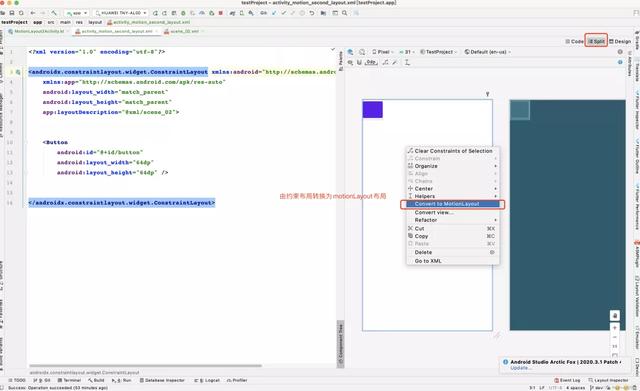
转换之后:
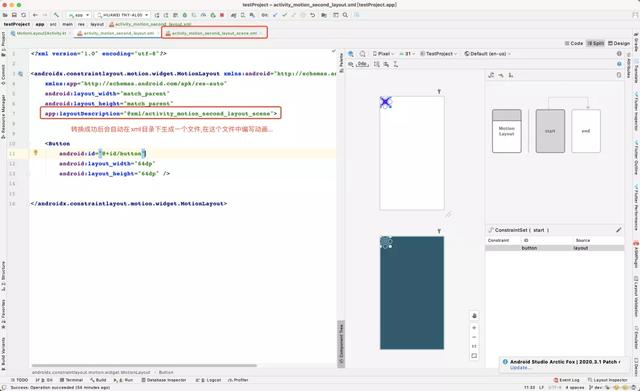
可以看出,这里定义了一个Button,如果说在ConstraintLayout,这样写会有警告,让约束起来,但是这里并没有。
没有的原因是因为定义了MotionLayout的layoutDescription属性,需要在layoutDescription属性中写。
1.点击动画OnClick
onClick#clickAction说明
motion:clickAction=“toggle”效果:
不添加动画到开始。
motion:clickAction=“transitionToStart”添加动画到开始。
2.多个view一起联动
例如这样:
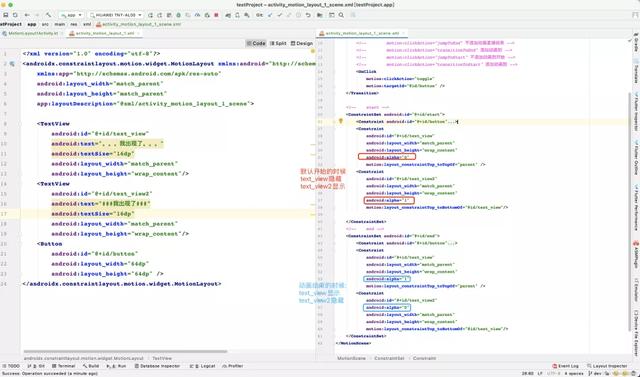
效果图
3.手指拖动OnSwipe
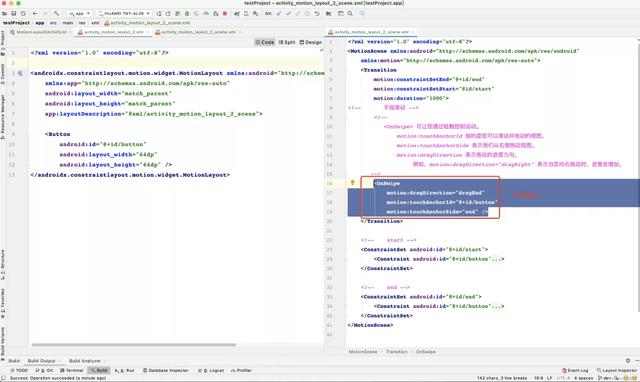
参数介绍:
motion:touchAnchorId 指的是您可以滑动并拖动的视图。motion:touchAnchorSide 表示我们从右侧拖动视图。motion:dragDirection 表示拖动的进度方向。例如,motion:dragDirection=“dragRight”表示当您向右拖动时,进度会增加。
效果图:
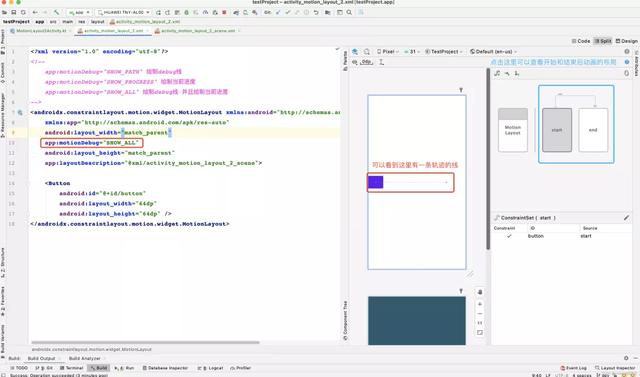
4.辅助工具
motionLayout默认会自带调试工具。
官方说明图:
还有一种使用视图的方式来调试:
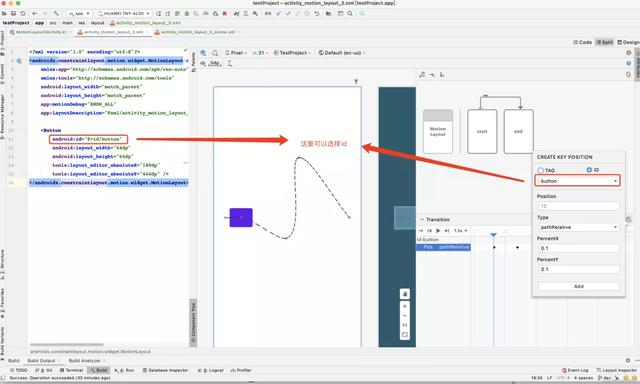
修改路径可以通过右侧可视化工具来进行:
详解图

再来看看自动生成的代码:
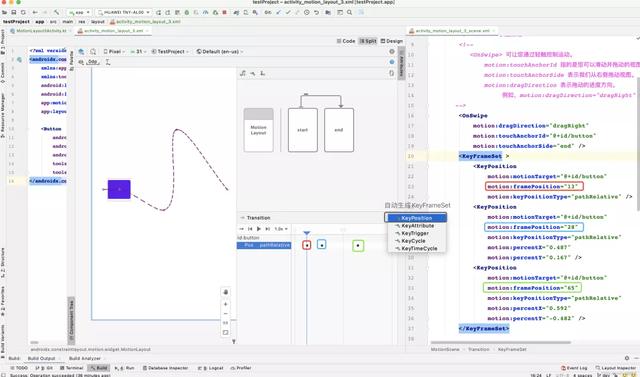
KeyPosition参数详解:
motion:motionTarget="@+id/button" 需要移动轨迹的viewmotion:framePosition="[0-100]" framePosition是一个介于 0 和 100 之间的数字。它定义了在动画KeyPosition中的应用时间,1 表示 1% 的动画,99 表示 99% 的动画motion:keyPositionType=“keyPositionType”这是如何KeyPosition修改路径。它可以是parentRelative,pathRelative,或deltaRelativepercentX | percentY是修改路径的量framePosition(值介于 0.0 和 1.0 之间,允许负值和值 >1)这里motion:keyPositionType参数解释一下:
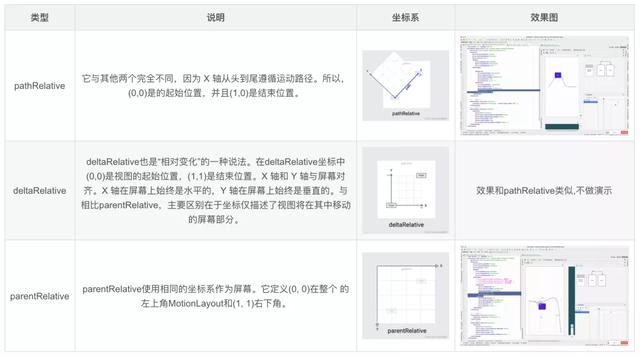
parentRelative
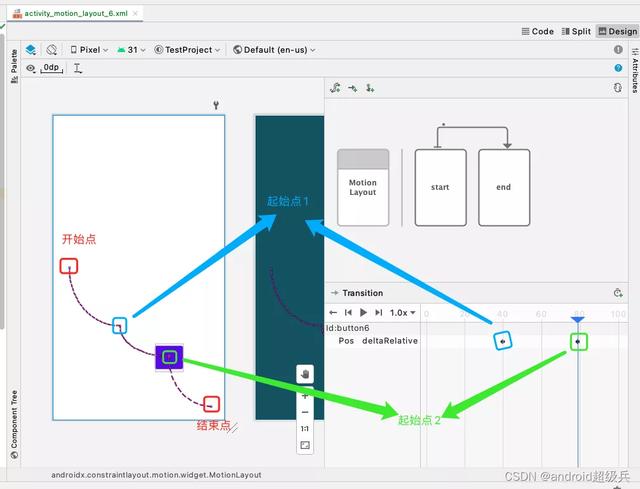
这里设置了4个点,分别为:

假设现在移动起始点1,deltaRelative会以开始点和起始点2来构建一个“贝塞尔环境”来生成对应的路径,这里和pathRelative效果类似但也有不同之处!
pathRelative和deltaRelative的区别:
pathRelative不需要依靠起始点和结束点就可以拖动deltaRelative 起始点和结束点在同一x轴上会导致动画路径不按照贝塞尔路径执行而是执行一条直线最终效果长这样:
效果都一样,就只放一个喽,需要的请下载源码观看。
KeyPosition配合pathMotionArc进阶
pathMotionArc见名之意就知道是用来画弧形的。先来看pathMotionArc简单的例子:
可以看出,想要画一条优雅的弧线很简单,只需要在开始点设置motion:pathMotionArc="startHorizontal"即可。
注意:motion:pathMotionArc是需要2个点才生效的,默认是开始点和结束点
如何设置多个点呢?例如这样,也可以设置两个弧形的比例大小等。
位置坐标说明:
pathMotionArc类型介绍:
startVertical 向下的弧形startHorizontal 向上的弧形none 直线flip 和上一个点如果上一个点是startVertical,,那么当前就是startHorizontal,可以理解为反转类型说明效果图
开始点:motion:pathMotionArc="startVertical"
起始点1:motion:pathMotionArc="startVertical"
起始点2:motion:pathMotionArc=“flip”
效果代码:
<?xml version="1.0" encoding="utf-8"?><MotionScene xmlns:android="http://schemas.android.com/apk/res/android" xmlns:motion="http://schemas.android.com/apk/res-auto"> <Transition motion:constraintSetEnd="@+id/end" motion:constraintSetStart="@id/start" motion:duration="1000"> <!-- 点击事件 --> <OnClick motion:clickAction="toggle" motion:targetId="@id/button6" /> <KeyFrameSet> <!-- 起始点1 和 起始点2设置"关联" --> <KeyPosition motion:framePosition="40" motion:keyPositionType="deltaRelative" motion:motionTarget="@+id/button6" motion:pathMotionArc="startVertical" motion:percentX="0.358" motion:percentY="0.17" /> <!-- 起始点2 和结束关联 --> <KeyPosition motion:framePosition="79" motion:keyPositionType="deltaRelative" motion:motionTarget="@+id/button6" motion:pathMotionArc="flip" motion:percentX="0.675" motion:percentY="0.568" /> </KeyFrameSet> </Transition> <!-- start --> <ConstraintSet android:id="@+id/start"> <!-- 开始点 和起始点1设置"关联" --> <Constraint android:id="@+id/button6" android:layout_width="80dp" android:layout_height="80dp" motion:layout_constraintBottom_toBottomOf="parent" motion:layout_constraintLeft_toLeftOf="parent" motion:layout_constraintTop_toTopOf="parent" motion:pathMotionArc="startVertical" /> </ConstraintSet> <!-- end --> <!-- 结束点不设置关联。。 --> <ConstraintSet android:id="@+id/end"> <Constraint android:id="@+id/button6" android:layout_width="64dp" android:layout_height="64dp" motion:layout_constraintBottom_toBottomOf="parent" motion:layout_constraintRight_toRightOf="parent" /> </ConstraintSet></MotionScene>
这里比例也是能改变的,例如这样:
这里还是比较简单的,自己动手试试就懂啦!
改变属性状态(KeyAttribute)看一眼代码:
<?xml version="1.0" encoding="utf-8"?><MotionScene x<?xml version="1.0" encoding="utf-8"?><MotionScene xmlns:android="http://schemas.android.com/apk/res/android" xmlns:motion="http://schemas.android.com/apk/res-auto"> <Transition motion:constraintSetEnd="@+id/结束了" motion:constraintSetStart="@id/开始了" motion:duration="1000"> <KeyFrameSet> <!-- 改变属性状态 --> <KeyAttribute motion:motionTarget="@+id/button7" motion:framePosition="22" android:alpha="0.2" /> </KeyFrameSet> <OnClick motion:clickAction="toggle" motion:targetId="@id/button7" /> </Transition> <!-- 开始 这里也可以定义中文,但是不建议使用。。 --> <ConstraintSet android:id="@+id/开始了"> <Constraint android:id="@+id/button7" android:layout_width="60dp" android:layout_height="60dp" motion:layout_constraintBottom_toBottomOf="parent" motion:layout_constraintLeft_toLeftOf="parent" motion:layout_constraintTop_toTopOf="parent" /> </ConstraintSet> <!-- 结束 这里也可以定义中文,但是不建议使用。。--> <ConstraintSet android:id="@+id/结束了"> <Constraint android:id="@+id/button7" android:layout_width="60dp" android:layout_height="60dp" motion:layout_constraintBottom_toBottomOf="parent" motion:layout_constraintRight_toRightOf="parent" motion:layout_constraintTop_toTopOf="parent" /> </ConstraintSet></MotionScene>mlns:android="http://schemas.android.com/apk/res/android" xmlns:motion="http://schemas.android.com/apk/res-auto"> <Transition motion:constraintSetEnd="@+id/end" motion:constraintSetStart="@id/start" motion:duration="1000"> <!-- 点击事件 --> <OnClick motion:clickAction="toggle" motion:targetId="@id/button6" /> <KeyFrameSet> <!-- 起始点1 和 起始点2设置"关联" --> <KeyPosition motion:framePosition="40" motion:keyPositionType="deltaRelative" motion:motionTarget="@+id/button6" motion:pathMotionArc="startVertical" motion:percentX="0.358" motion:percentY="0.17" /> <!-- 起始点2 和结束关联 --> <KeyPosition motion:framePosition="79" motion:keyPositionType="deltaRelative" motion:motionTarget="@+id/button6" motion:pathMotionArc="flip" motion:percentX="0.675" motion:percentY="0.568" /> </KeyFrameSet> </Transition> <!-- start --> <ConstraintSet android:id="@+id/start"> <!-- 开始点 和起始点1设置"关联" --> <Constraint android:id="@+id/button6" android:layout_width="80dp" android:layout_height="80dp" motion:layout_constraintBottom_toBottomOf="parent" motion:layout_constraintLeft_toLeftOf="parent" motion:layout_constraintTop_toTopOf="parent" motion:pathMotionArc="startVertical" /> </ConstraintSet> <!-- end --> <!-- 结束点不设置关联。。 --> <ConstraintSet android:id="@+id/end"> <Constraint android:id="@+id/button6" android:layout_width="64dp" android:layout_height="64dp" motion:layout_constraintBottom_toBottomOf="parent" motion:layout_constraintRight_toRightOf="parent" /> </ConstraintSet></MotionScene>
改变alpha值:
当然也可以设置多个属性,例如这样:
自行探索
android:visibilityandroid:alphaandroid:elevationandroid:rotationandroid:rotationXandroid:rotationYandroid:scaleXandroid:scaleYandroid:translationXandroid:translationYandroid:translationZKeyAttribute配合CustomAttribute设置颜色
CustomAttribute常用来设置view颜色的,是KeyAttribute的属性。来看看代码:
<?xml version="1.0" encoding="utf-8"?><MotionScene xmlns:android="http://schemas.android.com/apk/res/android" xmlns:motion="http://schemas.android.com/apk/res-auto"> <Transition motion:constraintSetEnd="@+id/end" motion:constraintSetStart="@id/start" motion:duration="1000"> <!--点击--> <OnClick motion:clickAction="toggle" motion:targetId="@id/imageView8" /> <KeyFrameSet> <!-- 旋转3圈到 100点 --> <KeyAttribute android:rotation="-720" motion:framePosition="100" motion:motionTarget="@id/imageView8" /> <!-- 0点 的时候黑色 --> <KeyAttribute motion:framePosition="0" motion:motionTarget="@id/imageView8"> <CustomAttribute motion:attributeName="colorFilter" motion:customColorValue="#000000" /> </KeyAttribute> <!-- 50点的时候红色 --> <KeyAttribute motion:framePosition="50" motion:motionTarget="@id/imageView8"> <CustomAttribute motion:attributeName="colorFilter" motion:customColorValue="#E91E63" /> </KeyAttribute> <!-- 100点的时候黑色 --> <KeyAttribute motion:framePosition="100" motion:motionTarget="@id/imageView8"> <CustomAttribute motion:attributeName="colorFilter" motion:customColorValue="#000000" /> </KeyAttribute> </KeyFrameSet> </Transition> <ConstraintSet android:id="@+id/start" ... /> <ConstraintSet android:id="@+id/end" ... /></MotionScene>
在里面CustomAttribute你必须指定一个attributeName和一个值来设置。
motion:attributeName是此自定义属性将调用的setter的名称。在这个例子中, setColorFilteronDrawable将被调用。
motion:customColorValue是名称中注明的类型的自定义值,在此示例中,自定义值是指定的颜色。
自定义值可以具有以下任何类型:
ColorIntegerFloatStringDimensionBoolean来看效果图就懂了。
如何创建
关键代码
<Transition motion:constraintSetEnd="@+id/end" motion:constraintSetStart="@id/start" motion:duration="1000"> <!--点击--> <OnClick ... /> <KeyFrameSet> <!-- motion:waveOffset 添加到属性的偏移值 motion:wavePeriod 要在此区域附近循环的循环数 motion:waveShape="cos" sin|square|triangle|sawtooth|reverseSawtooth|cos|bounce 正弦| 方形 |三角形 | 锯齿 | 反向锯齿 |cos| 反弹 --> <KeyCycle android:alpha="0.5" android:scaleY="1.2" android:scaleX="1.2" motion:framePosition="51" motion:motionTarget="@+id/imageView8" motion:waveOffset="2" motion:wavePeriod="1" motion:waveShape="sin" /> </KeyFrameSet> </Transition>
参数介绍:
motion:waveOffset 添加到属性的偏移值motion:wavePeriod 要在此区域附近循环的循环数motion:waveShape=“cos”sin|square|triangle|sawtooth|reverseSawtooth|cos|bounce各大类型效果图:
 设置抖动(KeyTimeCycle)
KeyTimeCycle和KeyCycle使用起来是一样的,参数也是一样的。
有一点不同的是,一般KeyTimeCycle是三个一起使用,通过3个KeyTimeCycle定义一个准确的循环关键帧。
可以看出,只有在第50帧的时候,会发生改变,因为第50帧的时候设置motion:wavePeriod为1。
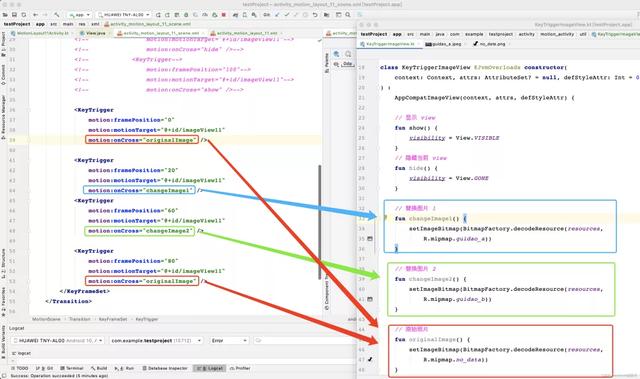
motion:wavePeriod:要在此区域附近循环的循环数改变控件属性(KeyTrigger)什么叫改控件属性?如何控制?
首先自定义ImageView,里面就2个方法,show和hide。
class KeyTriggerImageView @JvmOverloads constructor( context: Context, attrs: AttributeSet? = null, defStyleAttr: Int = 0) : AppCompatImageView(context, attrs, defStyleAttr) { // 显示 view fun show() { visibility = View.VISIBLE } // 隐藏当前 view fun hide() { visibility = View.GONE }}
如何使用:
<?xml version="1.0" encoding="utf-8"?><MotionScene xmlns:android="http://schemas.android.com/apk/res/android" xmlns:motion="http://schemas.android.com/apk/res-auto"> <Transition motion:constraintSetEnd="@+id/end" motion:constraintSetStart="@id/start" motion:duration="2000"> <!--点击--> <OnClick motion:clickAction="toggle" motion:targetId="@id/imageView11" /> <KeyFrameSet> <KeyTrigger motion:framePosition="0" motion:motionTarget="@+id/imageView11" motion:onCross="show" /> <KeyTrigger motion:framePosition="20" motion:motionTarget="@+id/imageView11" motion:onCross="hide" /> <KeyTrigger motion:framePosition="60" motion:motionTarget="@+id/imageView11" motion:onCross="show" /> <KeyTrigger motion:framePosition="79" motion:motionTarget="@+id/imageView11" motion:onCross="hide" /> <KeyTrigger motion:framePosition="100" motion:motionTarget="@+id/imageView11" motion:onCross="show" /> </KeyFrameSet> </Transition> <ConstraintSet android:id="@+id/start" .../> <ConstraintSet android:id="@+id/end" .../></MotionScene>
KeyTrigger参数介绍:
motion:onCross 调用的方法名字motion:framePosition 当前是第几帧 (0-100)motion:motionTarget 设置的控件id来看一眼效果:
根据这个思路,是不是就可以在滑动的过程中替换图标显示,例如这样:
再来一张辅助图,现在应该是非常清晰了!!
 加速与减速(Easing)
也是一个参数的效果,使用很简单,直接看代码:
<?xml version="1.0" encoding="utf-8"?><MotionScene xmlns:android="http://schemas.android.com/apk/res/android" xmlns:motion="http://schemas.android.com/apk/res-auto"> <Transition motion:constraintSetEnd="@+id/end" motion:constraintSetStart="@id/start" motion:duration="1000"> <!--点击--> <OnClick motion:clickAction="toggle" motion:targetId="@id/imageView13" /> <KeyFrameSet> </KeyFrameSet> </Transition> <!-- 开始 --> <ConstraintSet android:id="@+id/start"> <!-- motion:transitionEasing 设置加速度 or 减速 类型 --> <Constraint android:id="@+id/imageView13" android:layout_width="100dp" android:layout_height="100dp" motion:layout_constraintBottom_toBottomOf="parent" motion:layout_constraintLeft_toLeftOf="parent" motion:transitionEasing="acclerate" /> </ConstraintSet> <!-- 结束--> <ConstraintSet android:id="@+id/end"> <Constraint android:id="@+id/imageView13" android:layout_width="100dp" android:layout_height="100dp" motion:layout_constraintRight_toRightOf="parent" motion:layout_constraintTop_toTopOf="parent" /> </ConstraintSet></MotionScene>实战
先来看看实战效果:
布局长这样:
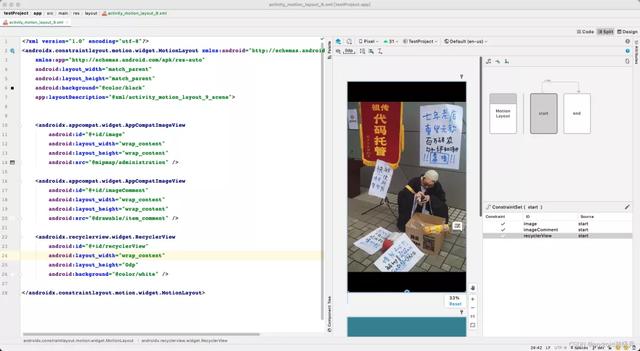
需求分析:
类似皮皮虾点击评论功能点击评论按钮时候,图片缩小,底下弹出一个recyclerview来显示评论recyclerview显示的时候,评论按钮不显示recyclerview不显示的时候,评论按钮显示activity_motion_layout_9_scene.xml
<?xml version="1.0" encoding="utf-8"?><MotionScene xmlns:android="http://schemas.android.com/apk/res/android" xmlns:motion="http://schemas.android.com/apk/res-auto"> <Transition motion:constraintSetEnd="@+id/end" motion:constraintSetStart="@id/start" motion:duration="400"> <OnClick motion:clickAction="toggle" motion:targetId="@id/imageComment" /> <OnSwipe motion:dragDirection="dragUp" motion:touchAnchorId="@id/recyclerView" /> </Transition> <!-- 开始 --> <ConstraintSet android:id="@+id/start"> <Constraint android:id="@+id/image" android:layout_width="match_parent" android:layout_height="match_parent" motion:layout_constraintBottom_toBottomOf="parent" motion:layout_constraintLeft_toLeftOf="parent" motion:layout_constraintRight_toRightOf="parent" motion:layout_constraintTop_toTopOf="parent" /> <Constraint android:id="@+id/imageComment" android:layout_width="40dp" android:layout_height="40dp" android:layout_marginRight="@dimen/dp_10" android:alpha="1" motion:layout_constraintBottom_toBottomOf="parent" motion:layout_constraintRight_toRightOf="parent" motion:layout_constraintTop_toTopOf="parent" motion:layout_constraintVertical_bias="0.7" /> <Constraint android:id="@+id/recyclerView" android:layout_width="match_parent" android:layout_height="0dp" motion:layout_constraintTop_toBottomOf="@id/image" /> </ConstraintSet> <!-- 结束 --> <ConstraintSet android:id="@+id/end"> <Constraint android:id="@+id/image" android:layout_width="match_parent" android:layout_height="0dp" motion:layout_constraintBottom_toTopOf="@id/recyclerView" motion:layout_constraintLeft_toLeftOf="parent" motion:layout_constraintRight_toRightOf="parent" motion:layout_constraintTop_toTopOf="parent" /> <Constraint android:id="@+id/recyclerView" android:layout_width="match_parent" android:layout_height="500dp" motion:layout_constraintBottom_toBottomOf="parent" motion:layout_constraintTop_toBottomOf="@id/image" /> <Constraint android:id="@+id/imageComment" android:layout_width="40dp" android:layout_height="40dp" android:layout_marginRight="@dimen/dp_10" android:alpha="0" motion:layout_constraintBottom_toBottomOf="parent" motion:layout_constraintRight_toRightOf="parent" motion:layout_constraintTop_toTopOf="parent" motion:layout_constraintVertical_bias="0.7" /> </ConstraintSet></MotionScene>
走到这里基本上就完事了。
总结大致结构:
<Transition app:constraintSetStart="@+id/start" app:constraintSetEnd="@+id/end" app:duration="1000"> <!-- 拖动 --> <OnSwipe /> <!-- 点击 --> <OnClick /> <KeyFrameSet > <KeyAttribute> <CustomAttribute/> </KeyAttribute> <KeyPostion/> <KeyCycle/> <KeyTimeCycle/> </KeyFrameSet> <!--用于过渡动画的起始点状态参数配置--> <Constraint android:id="@id/viewId"> <!-- 运动模型: 弧线路路径,时间模型等 --> <Motion/> <!-- 布局相关 注意: width 、 height 和 margin 的命名空间是 android: (beta1 开始) 而约束相关的命名空间是 app (或 motion ) --> <Layout/> <!-- 动画变换:做旋转,位移,缩放,海海拔等属性 --> <Transform/> <!-- 自定义属性 attributeName 会加上 set/get 反射找到真正的函数名, ⽐如 backgroundColor 就会调用 setBackgroundColor() 函数 custom(xxx)Value 对应属性的数据类型 --> <CustomAttribute/> <!-- 特定的属性 visibility 、alpha 等属性 --> <PropertySet/> </Constraint> <!--用于过渡动画的结束点状态参数配置--> <ConstraintSet android:id="@+id/end"../></Transition>
完整代码地址:
最后https://gitee.com/lanyangyangzzz/android_ui/tree/master
在这里就分享一份由大佬亲自收录整理的学习PDF+架构视频+面试文档+源码笔记,高级架构技术进阶脑图、Android开发面试专题资料,高级进阶架构资料
这些都是我现在闲暇时还会反复翻阅的精品资料。里面对近几年的大厂面试高频知识点都有详细的讲解。相信可以有效地帮助大家掌握知识、理解原理,帮助大家在未来取得一份不错的答卷。
当然,你也可以拿去查漏补缺,提升自身的竞争力。
真心希望可以帮助到大家,Android路漫漫,共勉!
如果你有需要的话,只需私信我【进阶】即可获取